Disclaimer: This post may contain affiliate links, meaning we get a small commission if you make a purchase through our links, at no cost to you. For more information, please visit our Disclaimer Page.
Maybe you and your family are already used to the fact that it takes more than one flush for you to leave the toilet, but you can't fail to notice how uncomfortable your guests feel after spending a long time of period in the toilet and wondering if it's their mistake that the toilet tank is not working.
It is even worse if you are still not used to it and just can’t come round to the fact that your toilet flush pressure is weaker than your nerves when it comes to this issue.
No matter which case it is, we all know how frustrating it can be, especially if we don’t do something about it. Instead of hiring an expert to solve this problem, you can become one yourself and fix the toilet flush pressure in no time. Here is a step-by-step guide on how to do it.

How to Increase Toilet Flush Pressure
Look for leaks or damages
This is the most common cause of the low toilet flush pressure, so it’s the most logical step to start by checking whether there are some damages in your toilet tank that need repairing.
1. Turn off the water in the toilet
Before turning off the water, try a simple test. In the local supermarket, find a food coloring supply, and add a few drops in the toilet tank. Leave it for the night and check it back tomorrow. If the water in the tank has changed color, it means that you have a leak. Proceed to turn off the water.
In order to repair anything or replace a part, you need to turn off the water prior. Make sure you find the shutoff valve on the wall that is connected to the toilet and then turn it clockwise to completely stop the flow of water.
Bear in mind that you should rotate the valve until it stops turning in order to completely turn off the water. After you successfully complete this, proceed to flush the toilet in order to empty the toilet tank.
2. Remove the toilet tank lid
After you have finished turning off the water, you can approach the toilet tank and continue searching for the problem. In order to do that, you have to remove the toilet tank to get an insight into all the parts of the tank.
This step is quite easy. The only thing you should worry about is how careful you are with the lid. Make sure you place it in the safe place, far from the toilet, as you will get to work there and you might end up breaking it accidentally if it gets in the way.

Now you are ready to determine the cause of your problem and get to the bottom of solving it.
3. Take a look at the internal flushing mechanism
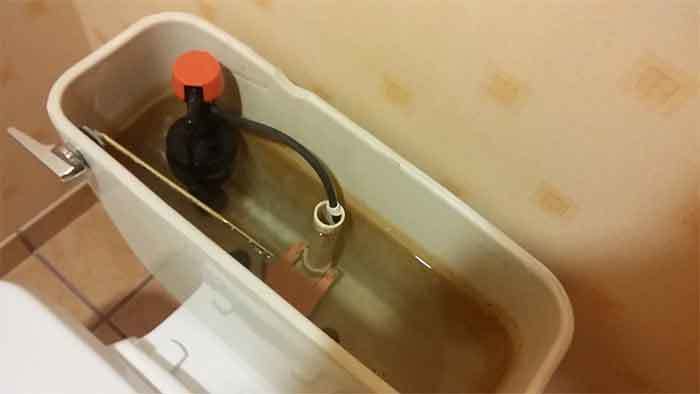
Now that you can see everything, make sure that you check carefully whether any part looks damaged. Look for a crack or a tear, but also bear in mind that if there aren’t any visible cracks, there still might be damage.
It is well known that the parts may stop functioning properly if they become worn out, so if you have your toilet tank for a while now, it might be that the parts are too old.
The main two parts you should pay attention to are the fill valve and the flush valve. If you don't know the difference between these two, the fill valve is a slender upright tube that refills the tank, and the flush valve is an open part at the bottom of the tank that contains usually a plastic flapper on a chain, which actually releases the water when you flush the toilet.
Don’t forget to check other parts too, especially the ballcock arm that is best described as a rubber ball that looks like a balloon. Check if there’s water in it, and if that’s the case – make sure you replace it with a new one, as the flushing mechanism won’t work properly due to it.
4. Repair the parts
By this step, you should have realized what the problem is and now it is only left to execute the solution.
Make sure you go to your local store or online and buy a proper replacement for the part of your toilet (one compatible with the model of the toilet you have) and replace it. Usually, with each part comes a guide on how to replace it, and you can always ask the person in the store for more specific advice.
Check whether the water level in the tank is appropriate
The second most common cause of the poor flushing pressure is the low water level in the tank. Here’s how to fix that.
1. Eliminate the water
Make sure you turn off the water supply (explained previously) as well to empty the toilet tank. This is the first thing you should do in order to be able to fix the problem.
2. Raise the fill valve
The fill valve is a slender upright tube that refills the tank. It controls how much water enters the tank and therefore is being released during the flashing. If you notice that it is damaged, you will need to replace it with the new one.
On the other hand, if it is not damaged, you just need to raise it. There are two ways to do this.
Firstly, if you have a fill valve that has a ballcock design with a floating rubber ball attached to a separate arm, you can adjust the water level by twisting the stem at the top of the arm counterclockwise. You will need a screwdriver to twist the stem.

Secondly, if your fill valve has a newer sliding cylinder construction, you just need to pinch the clips on the edge of the cylinder and raise it to the desired height. Bear in mind that you might have some indicators in the tank – for example, a line, or a water discoloration that show you what is desired height of the fill valve.
When you are done, flush the toilet to check whether it works better.
Clear the siphon jets
This might not be your favorite method for fixing the flush pressure but is quite effective, not to mention simple.
1. Pour vinegar in the tank
Of course, firstly you have to empty the toilet tank and turn off the water supply (explained with the details in the first method). Also, make sure that the rubber flap of the flush valve is closed.
After that, add approximately ½-1 gallon of pure distilled white vinegar. The amount might vary depending on the size of your tank, so just make sure that it covers completely the flush valve. Vinegar is perfect for cleaning, due to the fact that it contains mild natural acids, which are widely used in disinfection.
2. Cover the siphon jets with the duct tape
Make sure to cover all siphon jets with duct tape. You will probably use several pieces of the tape in order to cover all the jets around the toilet.
Now that you have everything cover, it’s time to flush the toilet and actually clean the siphon jets. When flushed, the vinegar will go through the jets, but due to the duct tape, it will stay there making the siphon jets clean. It is recommended to leave them for a night.
3. Remove the duct tape and clean the jets
Now it is time to remove the duct tape and use a smaller brush to clean each jet individually. After that, try flushing the toilet multiple times to recognize the difference.
Additional tips
Sometimes, there is no actual problem to be solved – the flushing pressure is up to the power of your toilet.
Therefore, if you are constantly unsatisfied it, you should consider buying a new toilet. There are special types of toilets with bladders that hold water under the pressure. They usually cost more, but for some people are the only solution.

If you are not willing to buy a new toilet, then just make sure to check regularly the old one, applying all three methods mentioned above. It should be more than enough to maintain the strongest power of your toilet flush.
Final Word: On Increasing Toilet Flush Pressure
Whether you were looking for a solution for you and your family, or for somebody else, we hope that this article was helpful to you. A problem with the toilet flush pressure is more than common worldwide, so there is no surprise that more and more people are looking for a way to deal with it.
You can choose from all of the methods that were mentioned and see which one fits you the best and improves your toilet flush pressure. Sometimes it is enough to apply only one method, but other times you will have to combine more than one for a complete improvement.
And in the end, if really nothing happens (which is almost impossible to happen), you can always search for a new toilet. If that’s a case, just make to check while buying some characteristics as the flush power.
Whichever solution you choose, good luck and let us know what helped you the most!
You might also like: Toilet Bowl Not Filling with Water after Flush


